If you’re one of the 25% of Americans who don’t get the recommended amount of physical activity each week, you might be all-too-familiar with a common side effect of spending a little too much time sitting: cranky hips, lower back pain, and the general feeling like your muscles have tightened up into a big ball of stress.
The good news? Yoga poses, specifically pigeon pose—also known as eka pada rajakapotasana in Sanskrit—can help by stretching the muscles in your lower back and hips, helping boost their mobility and making them feel more refreshed than ever.
For everything you need to know about pigeon pose—including which muscles it hits, the perks of adding it to your routine, and how to fix common form mistakes—keep on reading.
Which muscles does pigeon pose stretch?
According to physical therapist Kim Grundy, PT, pigeon pose stretches muscles in your lower body, including the following:
- Hip flexors: Located at the front of your hips, your hip flexors—which include the iliacus, psoas major, rectus femoris, and sartorius—are responsible for moving your legs and knees up toward your body. Say, for instance, if you were doing the high knees exercise.
- Piriformis: Your piriformis muscle, which goes from your lower spine to your upper thigh, rotates your hips, legs, and feet outward, helping you perform movement like stepping into a car.
- Glutes: Three glutes muscles make up your butt: the gluteus maximus, gluteus medius, and gluteus minimus. Together, they work to extend and rotate your thigh outward and allow you to do things like walk or run.
- Inner thighs: Your inner thighs are made up of five muscles that work to move your legs in toward the center of your body. This helps keep you steady and stabilized as you walk, per the National Library of Medicine.
What are the benefits of pigeon pose?
1. It can help your hips move easier.
“This pose is excellent for improving hip mobility, as it stretches multiple hip muscles at once,” Grundy says. “It can be particularly beneficial for individuals with tight hip flexors from prolonged sitting at a desk.” Along with helping your lower body simply feel less tense and achy, this can also help you tap into your full range of motion, which can come in clutch if you do exercises like squats and lunges at the gym.
2. It can ease pain.
Along with soothing the aches that come from simply sitting too much, pigeon pose can also help folks who live with sciatica—a condition that triggers pain in your sciatic nerve, which travels down each leg from your butt, and is often caused by injury to or pressure on the nerve. Because pigeon pose stretches your glutes, it can promote blood flow to your muscles and nerves in that area, which can help alleviate sciatic pain, according to Grundy.
Additionally, doing pigeon pose may also improve lower back pain, since it stretches the muscles there, Grundy says. And tight muscles can feel pretty damn achy!
Who should try pigeon pose?
There’s a big group of people who could benefit from this one: “Pigeon pose is a great stretch for those wanting to improve hip flexibility and loosen up the muscles in the lower back,” Grundy says. So, like we mentioned, pretty much all of us who spend a lot of time parked in a chair or on a couch.
You can do pigeon pose every day if you’d like—or whenever you want to loosen up your hips, glutes, and lower back, according to Grundy. Because it’s a static stretch (meaning, you hold it rather than move around), it’s best to do this pose after your muscles are already warmed up, she says, like at the end of an exercise session. Grundy suggests holding this pose for 30 to 60 seconds at a time.
If you have chronic back pain, hip or knee injuries, or if you’ve had a hip or knee replacement or back surgery, talk with your doctor or physical therapist before adding pigeon pose to your routine, Grundy says. You may need to make some modifications or skip the pose altogether to avoid further pain or injury (more on some possible tweaks you can make below).
What are some common pigeon pose mistakes to keep an eye on?
Proper form is important, according to Grundy. If you don’t have the flexibility to keep your front knee and hip in the correct position—a.k.a. your front shin parallel to the edge of your yoga mat—place a rolled towel under your bent knee, thigh, or butt until your flexibility improves, she says.
Additionally, it can be easy to let the hip of your outstretched leg roll to the side, according to Grundy. “Keep your hips facing forward while in this pose to maximize the stretch on your hip flexors,” she says.
How to do pigeon pose:
Katie Thompson
- Start in a tabletop position on your hands and knees on a yoga mat.
- Bring your right foot forward and place it down on the mat behind your right wrist.
- Adjust your shin so it’s parallel to the front edge of your mat.
- Extend your left leg back with the top of your left foot resting on the mat.
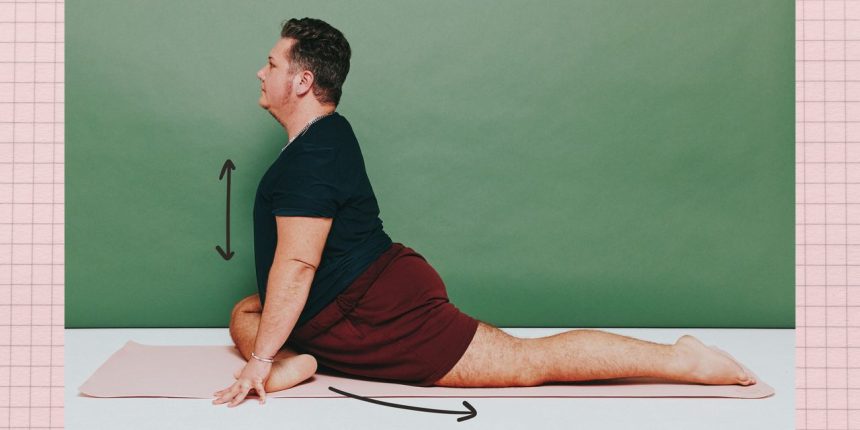
- Stay here or deepen the pose by folding your torso toward the floor—this will stretch hip flexors and glutes even more. Come onto your forearms or rest your head on your palms. You can also keep your chest up and graze the floor with your fingertips as pictured.
- Hold this position for 30 to 60 seconds, then repeat on the opposite side.
Demoing the move above is Heart Gardener, a certified queer, trans, and fat yoga instructor and social worker in training based in Queens, New York.
Related:
- Do I Get a ‘Better’ Cardio Workout If I Go Faster or Longer?
- 15 Warning Signs You Might Be Underfueling Your Workouts
- The Right Way to Do Boat Pose If You Really Want to Fire Up Your Abs
Get more of SELF’s great fitness coverage delivered right to your inbox—for free.